By Supervising Librarian of Creative Technology John Gargiulo
Have VHS tapes, cassette tapes, or film negatives you’d like to digitize and preserve? The library’s new Media Preservation Station has equipment to help you do just that.
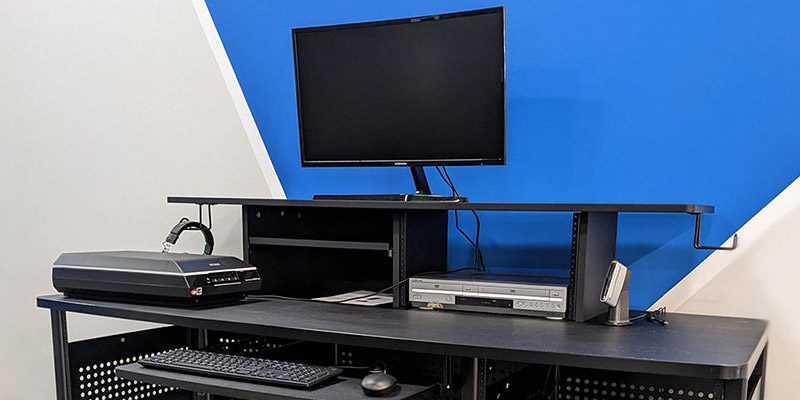
Located on the third floor of the Main Library in the Creative Studio, the station provides a VCR, a cassette player, and a high-quality scanner for you to turn your analog media into digital files. The scanner is capable of scanning documents, photos, 35mm negatives, 120/medium format negatives, and slides.
Ready to get started? Learn how to reserve the Media Preservation Station »
But first, let’s review a few recommendations to keep in mind while using this new resource.
What to know before using the station
In-person, one-on-one training is available
Prior training is not required for you to use the Media Preservation Station. That being said, you can schedule a Learning Lab with library staff to review how to use this resource. We also highly recommend scheduling a Learning Lab if you plan to scan film negatives or slides.
What to bring with you to the station
First, make sure to bring the analog media you want to digitize, such as a VHS tape, audio cassette, or collection of film negatives or slides. For any type of media, make sure you bring some form of external hard drive to save your files after you’ve digitized them. This might look like a small flash drive or a larger external hard drive that you plug into the computer with a cable.
If you plan on scanning film negatives or slides, we recommend that you bring in cotton or non-latex gloves to handle your materials. We also recommend holding these materials carefully by the sides to minimize accidental damage.
Decide what file type you’ll want to save as
When digitizing your analog media, it’s worth considering what type of digital file you will be saving it as. Different file formats will affect factors such as file size and quality. It’s also a good idea to use sustainable file formats, which are likely to still be used 5-10 years from now.
Find tips on recommended digital file types for archiving images and audio/video files.
Bring an external hard drive to save your work
For your privacy, all user files are permanently erased from Creative Studio computers when your computer session ends. Bringing an external hard drive will allow you to save your work to take home.
While you can also back up files to cloud storage sites such as Google Drive or Dropbox, it may take a while to back up video files, which can be quite large. Bringing an external hard drive will help make sure you have enough time to save your files before your computer session ends.
Make multiple backups
Once your work at the Media Preservation Station is complete, it is a good idea to back up your files in multiple places. This might look like copying your files to an additional external hard drive or backing them up on both an external hard drive and on cloud storage like Google Drive or Dropbox.
Many people use the 3-2-1 rule, which Wikipedia explains by stating: “there should be at least 3 copies of the data, stored on 2 different types of storage media, and one copy should be kept offsite, in a remote location (this can include cloud storage).”For more information on best practices for organizing and storing files, check out this article on what to do with your digital stuff »

About John
John is a member of the library’s digital learning team and recent graduate of the University of Illinois MS in Library and Information Science program. He enjoys working with patrons to discover how we can demystify technology and shape it to help us with our different needs. He is also a musician and loves making noise.